Blast2GO RLM License Server Setup (Reprise)
This manual provides step-by-step instructions to setup a license server and to install a floating license for the Blast2GO Command Line (i.e. the blast2go_cli(.exe) client).
To continue you need a server activation key (e.g. RLM-ABCDXYZ-F2G3H4J) and a floating_license.lic file, which is provided via email.
Note:
- The RLM Licence Server needs access to the internet for activation via the Reprise hosted RLM activation server.
- All clients (Blast2GO CLIs) will checkout its license from the your local license server and do not need to be connected to the internet.

Before you start: Do’s and Dont’s:
- On Linux/Unix, do not run rlm or blast2go_cli with root privileges.
- Make sure that the user that runs rlm has read write access to /var/tmp and that the folder exists.
- Do not locate rlm(.exe) and blast2go_cli in the same folder.
- Do not try to install the RLM Server in a virtual environment (the Blast2GO client can still run in a VM)
- User Manual
- Product sheet
- Command Line Report
(Example: Tomato Genome)
- Blast2GO Command line tools are designed to work on all three major platforms (Linux, Mac OS, Win).
- All systems have to have Java 11+ installed.
- We recommend at least 1 GB of ram.
- For a local Blast2GO database a MongoDB server (version 3.4.6+) is necessary.
RLM License Server Installation
(If you already have an exisitng RLM Server up and running, please jump to the next section)
- Download the License Server here:
- Choose a suitable server for your license server. This should be a stable server with access to the internet (tcp port 80).
- Copy the server files and the floating license file you received by email into the same folder on the server.
- Start rlm(.exe) from the console. Important: Do not run rlm(.exe) as root user. This will start a small web server which allows you to activate the license server (amongst other things). Internet connection is necessary.
- For activation, enter its web interface by switching to serverip:5054 in a browser.
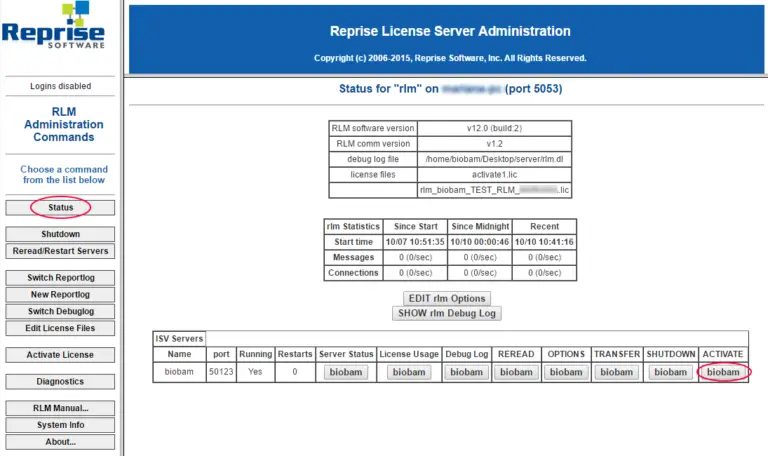
Login with user admin, leaving the password field blank. Once successfully logged in, the password should be changed by clicking Change Password in the left-hand menu. (see image below)
Go to Status and select ACTIVATE on the far right-hand side of the ISV row for biobam.
Introduce your activation key in the corresponding field and press Activate Alternate Server Hostid. The license server needs to be running at all time, as long as there are Blast2GO clients connected to it. We recommend to install the license server as a system service. The Linux/Unix version of this package contains a script called rlmd and contains daemon installation instructions.
Add a floating CLI license to your existing RLM server
(Skip this step if you just performed the previous step of installing a new RLM Server)
- If you already have an existing RLM server running, simply copy biobam.set and floating_license.lic to the server’s license file location.
- Now activate the license: Enter the server’s web interface by switching to serverip:5054 in a browser.
- Go to “Status” and select “ACTIVATE” on the far right-hand side of the ISV row for “biobam”.
- Introduce your activation key in the corresponding field and press “Activate Alternate Server Hostid”. This may take a few seconds to complete.
Blast2GO CLI Client Setup
- Download the Blast2GO CLI Client to the server/workstation of your choice. Please make sure to keep them in a different folder than the RLM server binaries in case they are located on the same machine.
- Extract the compressed files.
- To link the blast2go_cli(.exe) executable with the licence server we need to provide the IP of the RLM Server installed in the first setp.
- To do so we place the floating_license.lic into the same directory as the executable and adjust the HOST line. Open the license file (.lic) with a text editor and replace “localhost” with the IP address or hostname of your server, e.g.:
HOST 192.168.1.66 license=XX 5053 - Now start blast2go_cli(.exe) with the -showlicenseinfo option to verify that everything works correctly.
- Get started with the CLI user manual and continue with the GO database setup and use case examples.
Proxy
If your server is behind a proxy, please configure it as follows: – On Linux start rlm with:
env HTTP_PROXY=proxy_ip:8080 ./rlmBasic authentication is also possible:
env HTTP_PROXY=proxy_ip:8080 HTTP_PROXY_CREDENTIALS=joe:joes_password ./rlmMake sure to adjust rlmd accordingly.
Intranet Firewall
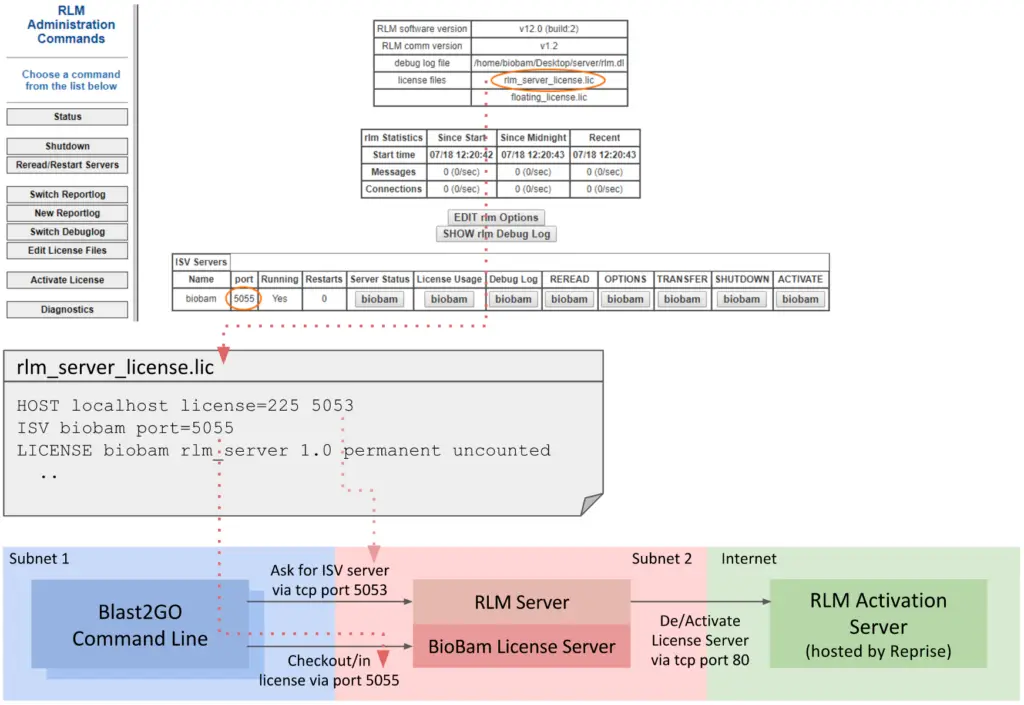
If the connection between Blast2GO CLI client and the RLM Server is restricted by a firewall, it is necessary to open TCP communication ports 5053 (license checkout), 5054 (web interface) and an additional port which you can choose as well (We will use 5055 in this example). In order to do so you have to locate and modify the RLM license file, please refer to the schema on the right to learn more. It is necessary to restart the whole server (not just the ISV server by clicking restart in the web interface), in order to apply changes.
Once you have everything configured, we recommend that you restart the RLM server and check whether it uses the ports you have configured:
~$ sudo service rlmd restart
+/home/biobam/Desktop/server/rlm.dl
~$ sudo lsof -i | grep rlm
rlm         996  biobam    3u  IPv6 44565532      0t0  TCP *:5053 (LISTEN)
rlm         996  biobam    4u  IPv4 44565533      0t0  UDP *:5053
rlm         996  biobam    5u  IPv4 44562985      0t0  TCP *:5054 (LISTEN)
rlm         998  biobam    3u  IPv6 44565532      0t0  TCP *:5053 (LISTEN)
rlm         998  biobam    4u  IPv4 44565533      0t0  UDP *:5053
rlm         998  biobam    6u  IPv6 44565836      0t0  TCP *:5055 (LISTEN)
We can see here that rlm only uses exclusively lists to the 3 specified ports (5053, 5054, 5055). According to RLM documentation, UDP ports are used for broadcast messages, and not necessary in this configuration, i.e. It is not necessary to forward UDP ports.
Access Control to the RLM Web Interface
You can control the access to the web interface via a list of users with passwords and different privileges. Details are explained in the chapter Access Control to the RLM Web Interface in the RLM Manual. You get to the manual by accessing the web interface and clicking RLM Manual… in the menu on the left.
Troubleshooting
If you experience problems during the setup, please send an email to clisupport@blast2go.com.